Thoracostomy

Warning

Objective

To outline the procedure for performing an open or tube thoracostomy on deployed operations.

Scope

This guideline describes the technique to be used for patients requiring any type of thoracostomy in a forward medical location or deployed Emergency Department (ED). Recognition of conditions requiring thoracostomy is not included in this guidance and alternative CGOs are available for guidance - in particular CGOs for 

This guideline does not describe surgical or critical care techniques used beyond the ED in a deployed hospital care setting.

Audience

This guideline is intended for the use of appropriately trained registered healthcare professionals fulfilling a general role in forward medical locations or in an Emergency Department on deployed operations.

Background

Patients should be assessed following a systematic approach using MARCH principles. Assessment and recognition of clinical conditions requiring thoracostomy is covered in relevant CGOs.

There are three types of thoracostomy procedure that may be undertaken, depending on the situation and clinical indications:

  • Open (Finger) Thoracostomy 
  • Tube Thoracostomy:
    • Surgical Chest Drain 
    • Seldinger Chest Drain 

 Personnel must only utilise thoracostomy techniques for which they have completed training and which fall within their current scope of practice. 

Indications

Open (Finger) Thoracostomy

Traumatic Cardiac Arrest – bilateral open thoracostomies should be considered in accordance with the Traumatic Cardiac Arrest CGO

Suspected Tension Pneumothorax in a patient on Positive Pressure Ventilation (PPV).

Suspected Tension Pneumothorax causing significant compromise after two failed attempts at needle decompression in the spontaneously ventilating patient.


Tube Thoracostomy – Surgical Chest Drain

Traumatic Pneumothorax - if any of the following apply:

  • Clinically causing respiratory failure.
  • Moderate or Large in size on Chest X-Ray.
  • In any patient requiring positive pressure ventilation for another reason.
  • Urgent fixed wing air MEDEVAC planned, following discussion with AELO

Haemothorax – Any significant haemothorax visible on plain film chest X-ray (or CT).

After Open Thoracostomy or Needle Decompression – unless exceptional circumstances with expert guidance.

Spontaneous pneumothorax – If deployed without access to Seldinger chest drain system and indicated as below.


Tube Thoracostomy – Seldinger Chest Drain

Spontaneous Pneumothorax where it is safe to intervene (>2cm laterally or at Apex OR ultrasound confirmed location) and any of the following apply:

  • Haemodynamic compromise.
  • Ventilatory failure.
  • Bilateral pneumothoraces.
  • Underlying lung disease.
  • Over 50 years old with significant smoking history.
  • Urgent fixed wing air MEDEVAC planned, following discussion with AELO. 

Pleural Effusion/Empyema if either:

  • Effusion large enough to cause ventilatory failure.
  • Suspected empyema requiring drainage for source control.


Preparation

A quick reference guide for preparation and open/finger thoracostomy is available here and a further quick reference for tube thoracostomy (both surgical and Seldinger) is available here.

Manage patients using a systematic approach in line with MARCH principles.

Open (Finger) Thoracostomy is the only emergent procedure covered within this guideline. All other forms of thoracostomy can be undertaken in a planned and prepared manner with considered decisions around indications, risks, preparation of equipment/environment and post procedure management.

Aseptic technique - all forms of thoracostomy carry a high risk of introducing infection into the pleural space and must be undertaken in as sterile a manner possible within tactical constraints. The risk of infection must be taken into account as part of the decision making process. As a minimum  the casualty’s skin should be cleaned with alcohol/chlorhexidine/iodine based solutions, hand hygiene should be completed and sterile gloves should be worn. Where asepsis is compromised, or there is significant contamination, consideration must be given to early use of antibiotics in line with Deployed Anti-microbial guidance.

Analgesia - all forms of thoracostomy are extremely painful and in the awake patient consideration must be given to delivery of local anaesthesia and systemic analgesia. In some patients this may be insufficient and procedural sedation may be required. Local anaesthesia should be generous, whilst adhering to maximum doses: the skin and the parietal pleura are the most sensitive tissues involved, so inject under the skin first then advance the needle into the pleural space, aspirate to confirm position, then carefully withdraw while until aspiration is no longer possible. At this point the tip of the needle should be at the surface of the parietal pleura - infiltrate further anaesthetic here.

Consent - in an awake patient who has capacity, verbal consent should be obtained and documented.

Positioning - this is key for all forms of thoracostomy. Raise the arm on the affected side and either position behind the casualties head or abduct the arm and supported in a “cruciform” position. In a female casualty or with significant obesity, if required, breast or adipose tissue should be moved anteriorly and kept clear of the surgical site throughout the procedure, using an assistant if required. 

Landmarks - careful defining of landmarks is required for all forms of thoracostomy. The correct location in the “safe triangle” minimises risk of neurovascular, diaphragmatic and underlying organ injury. The safe triangle is bordered by the lateral border of Pectoralis Major anteriorly, the Anterior border of Latissimus Doris posteriorly and the superior border of the 6th Rib inferiorly. This will generally give an insertion site in the 4th or 5th intercostal space just anterior to the mid-axillary line. 

Ultrasound - if a chest drain is being placed for a pleural effusion then point-of-care ultrasound (POCUS) should be used, if available, to confirm optimal location prior to insertion. The safe triangle described above remains the most common and safest approach but in expert hands this may be varied based on POCUS imaging.

Open (Finger) Thoracostomy Procedure

Quick reference available here.

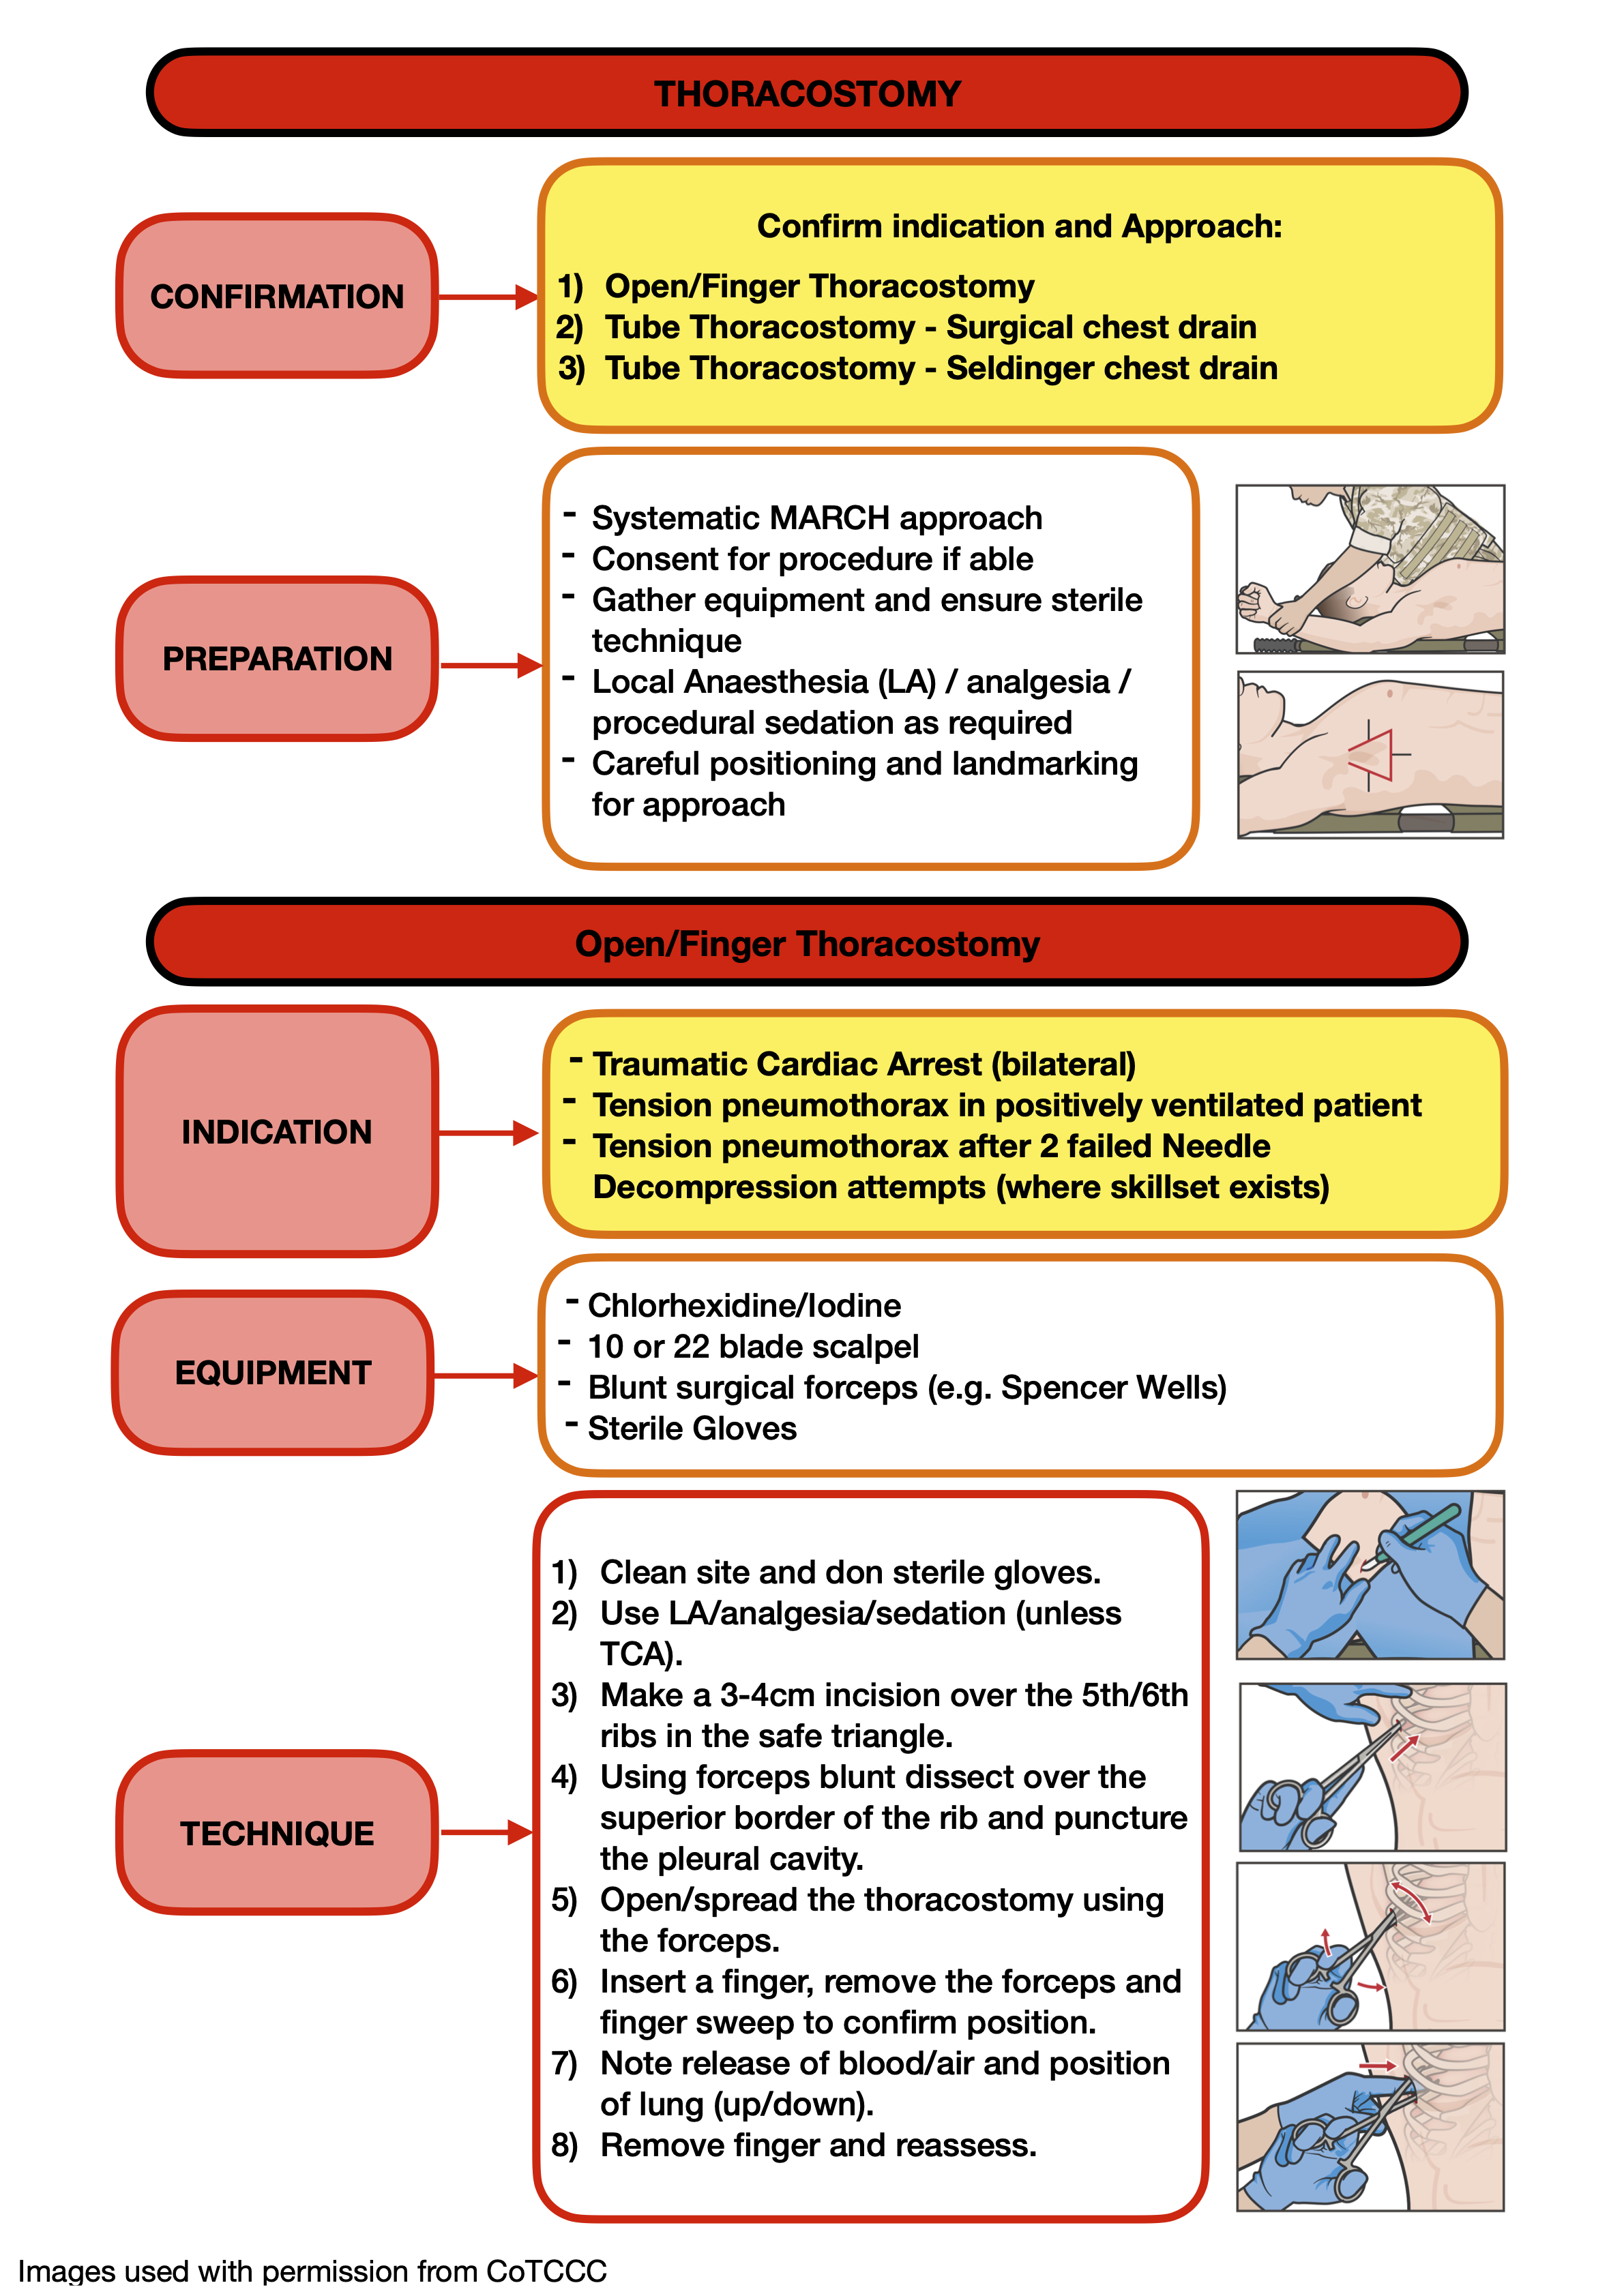
This is an emergent procedure, but time should be allowed to prepare, position the casualty and confirm landmarks as above.

Gather equipment required – Chlorhexidine or iodine to clean site, 10/22 blade scalpel, blunt surgical forceps (e.g. Spencer-Wells), sterile gloves, local anaesthetic and delivery equipment. Clean the surgical site and put on sterile gloves.

This procedure should only be undertaken if the patient is in cardiac arrest or significantly compromised due to a tension pneumothorax, so administering local anaesthetic would not be appropriate, but if the patient is already sedated for positive pressure ventilation then delivering a bolus of analgesia/sedation may be possible and beneficial.

Make a 3-4cm incision into the skin overlying and parallel to the 5th rib.

Using blunt forceps perform a blunt dissection through the soft tissue passing over the superior aspect of the rib. Puncture the parietal pleura in a controlled manner, feeling the “pop” as the forceps tip enters the pleural cavity.

Either spread the forceps repeatedly to open the space OR with closed forceps “strip” the rib space laterally to open a tract through the parietal pleura large enough to admit a gloved finger.

Carefully insert a gloved finger through the incision alongside the forceps and into the pleural space to verify position. Remove the forceps leaving the finger in place. Note any release of air or blood and the position of the lung (collapsed/down or inflated/up) on first insertion. Allow 10-15 seconds of air flow past the finger to decompress the chest cavity.

Remove the finger. In the spontaneously ventilating casualty immediately apply a vented chest seal over the wound. In the positive pressure ventilated casualty leave the thoracostomy open and unobstructed.

Bilateral thoracostomies should be performed in traumatic cardiac arrest and in the patient receiving positive-pressure ventilation unless there is convincing evidence that the pathology is confined to one side of the chest, but bilateral open thoracostomies, even with chest seals, should be avoided in spontaneously breathing patients.


Post-Procedure Care

Reassess the casualty for improvement in clinical signs, reduction of respiratory distress or if performed during Traumatic Cardiac Arrest for signs of Return of Spontaneous Circulation (ROSC). 

Continue to monitor and record vital signs, provide appropriate analgesia and manage concurrent injuries in line with the MARCH approach. If undertaken forward of the deployed hospital environment, a thoracostomy wound should be considered as potentially contaminated, and prophylactic antibiotics should be administered accordingly, following current antimicrobial guidance.

Return of signs/symptoms of tension pneumothorax suggests thoracostomy obstruction. Every attempt should be made to avoid this by monitoring the site and avoiding physical blockage. If this does occur it will be necessary to “Re-Finger” the thoracostomy. Re-insert a clean gloved finger along the surgical tract into the pleural space and again allow 10-15 seconds of air flow past the finger to decompress the chest cavity. This may be required repeatedly and consideration should be made to surgical chest drain placement in line with the procedure described below.

In the positive pressure ventilated casualty it is not necessary to immediately progress to surgical chest drain placement if there are other clinical priorities but this is likely to be required eventually in nearly all situations to facilitate ongoing care and safe MEDEVAC.


Paediatric Considerations

A smaller incision and smaller forceps may be required in paediatric patients. Careful attention should be paid to passing immediately above the rib in small rib-spaces to avoid the neuro-vascular bundle.

In small children it may be impossible to insert a finger through a rib space. In this situation one or two forcep tips should be used to widen the parietal pleural incision and hold it open for long enough to decompress the pleural cavity. 


Prolonged Casualty Care

Continue to monitor vital signs and manage analgesia as per the above recommendations. 

Maintain cleanliness of thoracostomy site, consider covering with a vented chest seal to aid with this. Deliver antibiotics in line with current antimicrobial guidance.

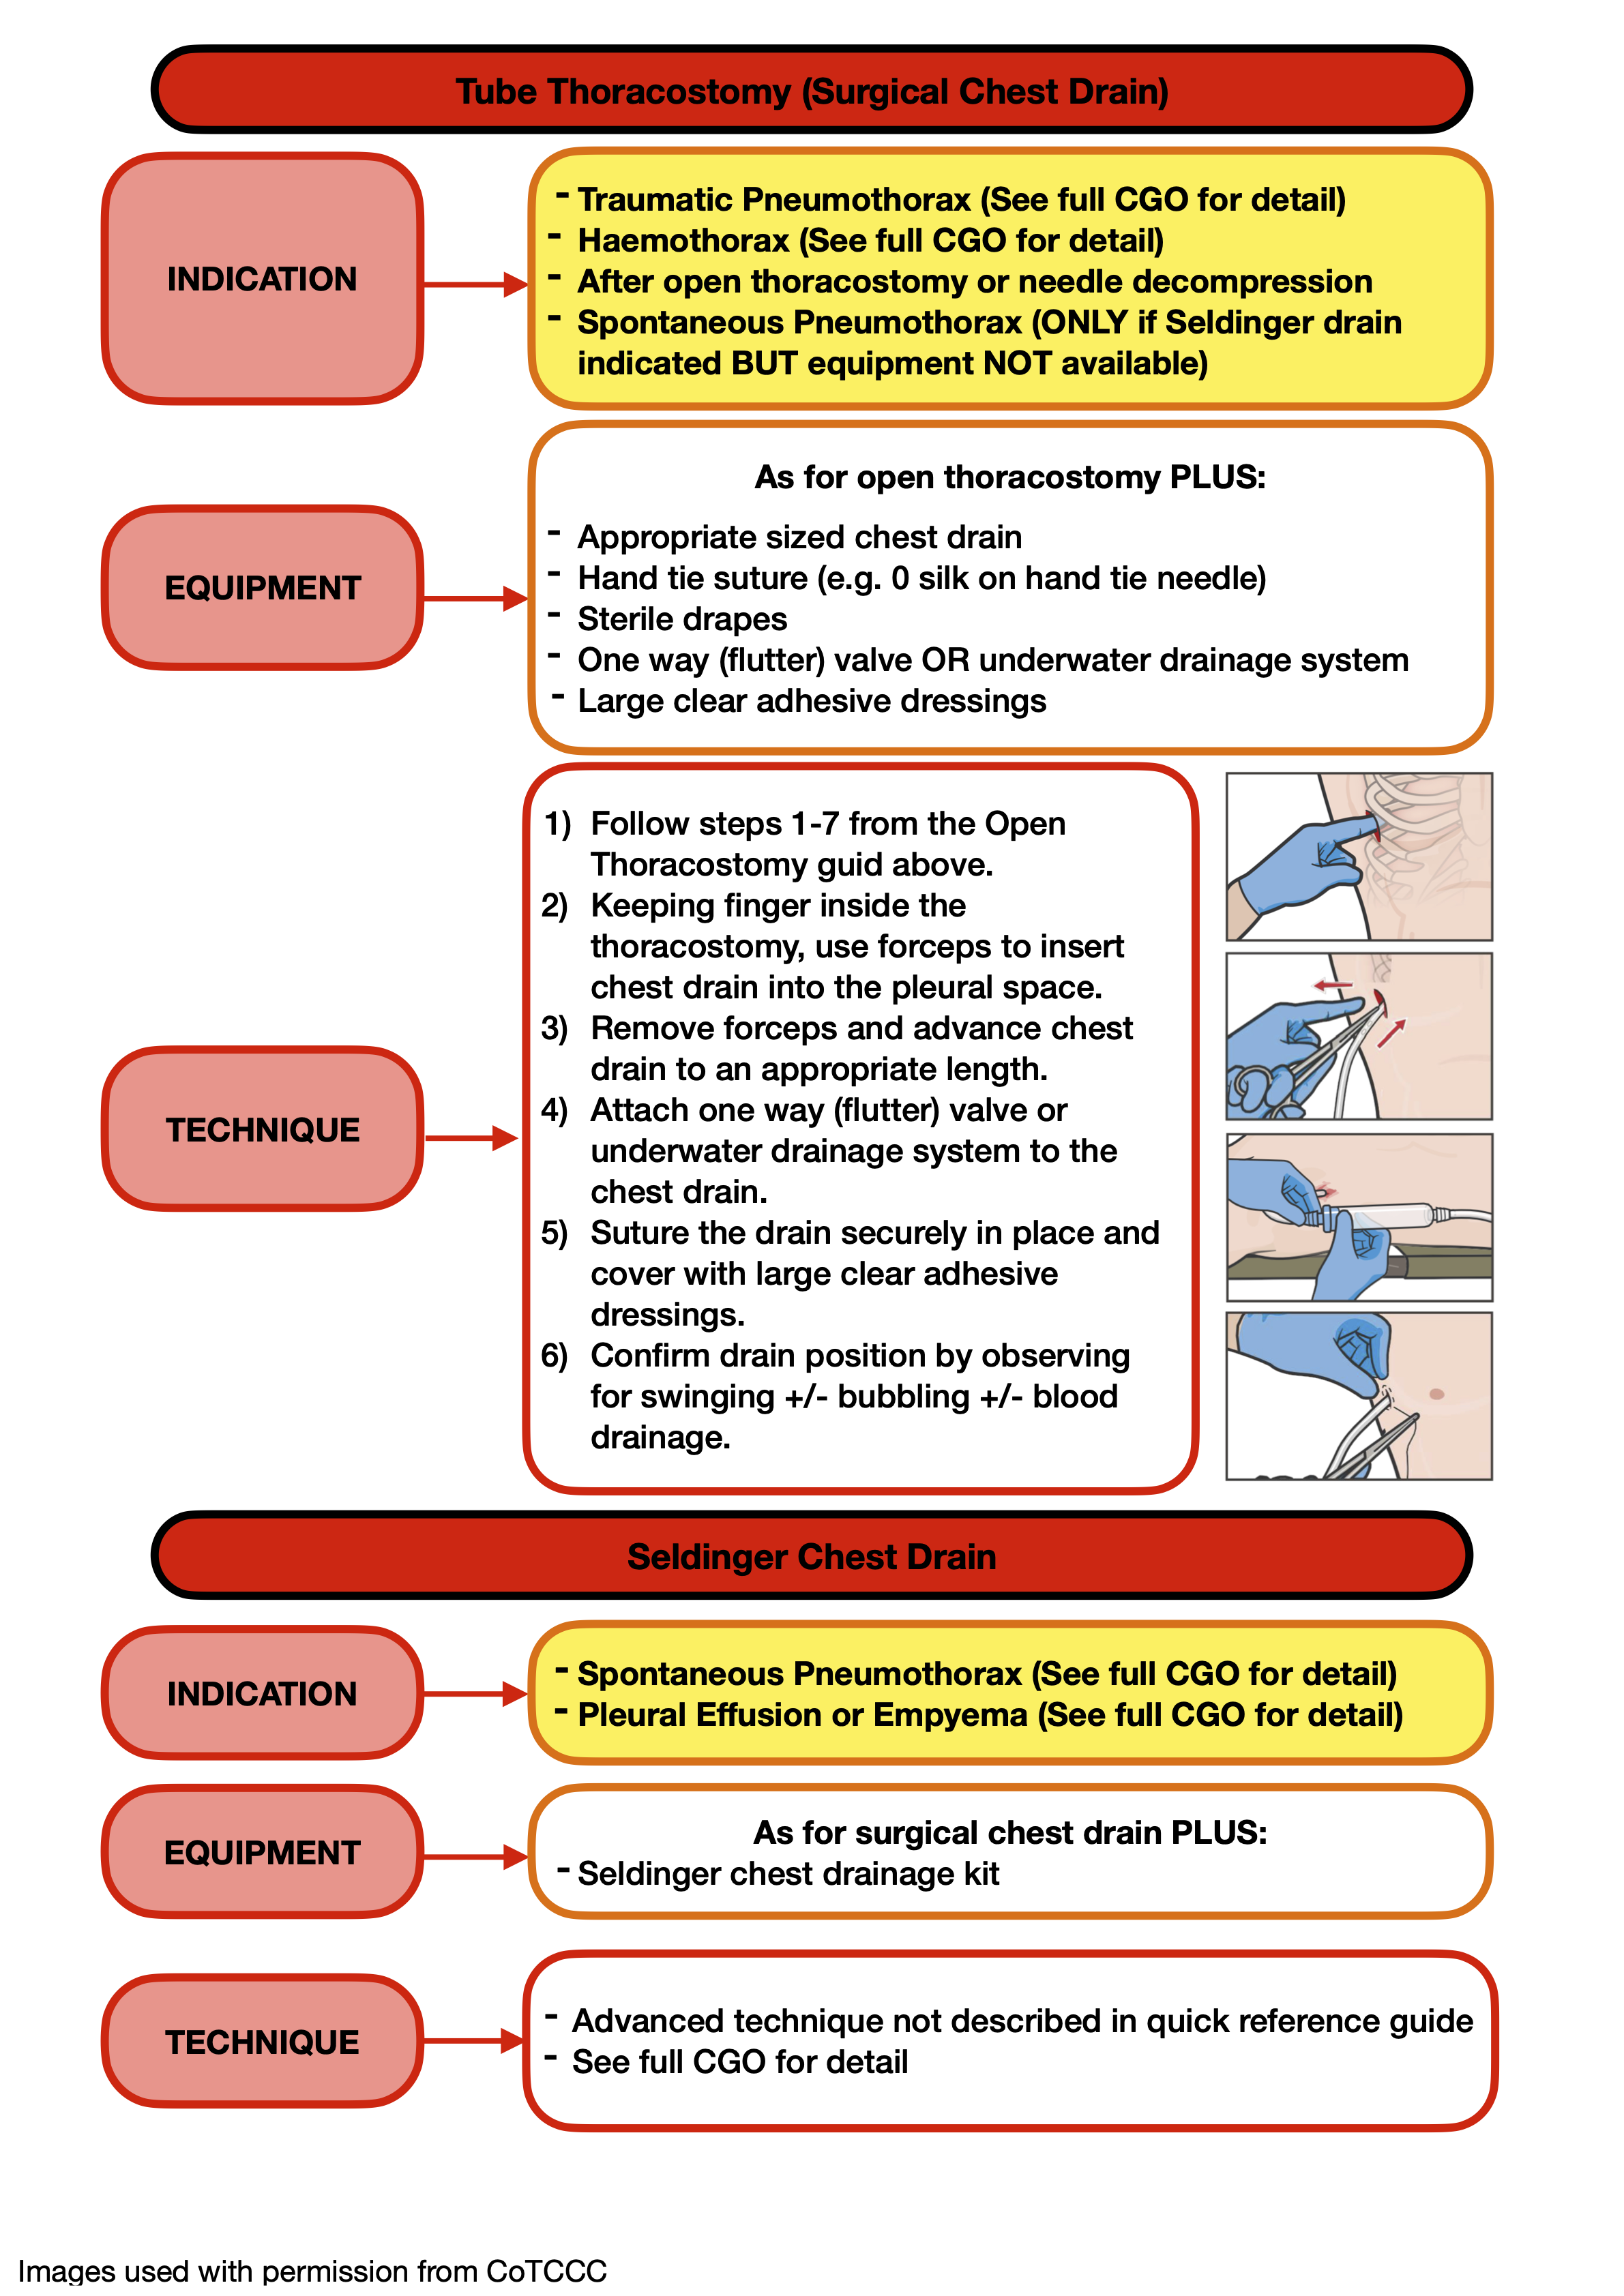
Consider progressing to insertion of a surgical chest drain if the patient experiences repeated episodes of tension pneumothorax requiring re-fingering of the thoracostomy. A drain may also be inserted in preparation for evacuation if it is thought that monitoring or accessing the thoracostomy site may be difficult in transit.

Tube Thoracostomy - Surgical Chest Drain

Quick reference available here.

Prepare, position the casualty and confirm landmarks as above. 

Gather equipment required – Chlorhexidine or iodine to clean site, 10/22 blade scalpel, blunt surgical forceps (e.g. Spencer-Wells), sterile gloves, appropriate size chest drain (24-32 Fr), hand tie suture (e.g. 0 Silk on large straight/curved needle), sterile drapes, one way (flutter) valve OR underwater drainage system, dressings, local anaesthetic and delivery equipment.

If using a one way (flutter) valve, ensure this is prepared for use and with the remainder of the equipment. If using an underwater drainage system have an assistant prepare this and be ready to hand you the patient connector once the drain is successfully inserted.

Clean the surgical site and put on sterile gloves. Position sterile drapes allowing a window around the identified insertion site. Deliver local anaesthetic as above unless the casualty is anaesthetised. Consider systemic analgesia or sedation as appropriate. 

Make a 3-4cm incision into the skin overlying and parallel to the 5th rib.

Using blunt forceps perform a blunt dissection through the soft tissue passing over the superior aspect of the rib. Puncture the parietal pleura in a controlled manner, feeling the “pop” as the forceps tip enters the pleural cavity.

Either spread the forceps repeatedly to open the space OR with closed forceps “strip” the rib space laterally to open a tract through the parietal pleura large enough to admit a gloved finger.

Keeping a gloved finger inside the pleural cavity insert the blunt forceps through the final drainage eyelet of the chest drain. Using the forceps, carefully guide the tip of the chest drain past the gloved finger and into the pleural space.

Remove the forceps and advance the chest drain alone further into the pleural cavity ensuring all drainage eyelets fully enter the pleural space. The gloved finger can be used to attempt to guide the drain inferiorly for blood/fluid or superiority for an isolated pneumothorax. In most adults the drain will be between 15-20cm in length at the skin. 

Fogging of the tube, release of air with ventilation or release of blood may be observed as an initial confirmation of position. In the spontaneously ventilated patient, the drain should be immediately connected to the one-way valve or underwater circuit. Care should be taken to avoid the weight of either system pulling out the newly inserted drain. In the patient with positive pressure ventilation there is no urgency to attach either system, but the underwater circuit may be attached if there is significant blood loss, or the chest drain may be temporarily clamped using the forceps.

Suture the drain in place using a recognised securing technique before covering with clear adhesive dressings and securing with further tape.

Observe the one-way valve for movement OR the underwater circuit for “swinging” (movement of the water level) and/or “bubbling” with ventilation as a confirmation of position within the pleural cavity.


Post-Procedure Care

Reassess the casualty for improvement in clinical signs and/or reduction of respiratory distress. 

When possible, obtain a Chest X-Ray to confirm drain position and improvement in haemo/pneumothorax. Serial POCUS may be used in experienced hands where this is not available.

Continue to monitor and record vital signs, provide appropriate analgesia and manage concurrent injuries in line with the MARCH approach.

Chest drain activity should be monitored and documented. If connected to an underwater circuit as a minimum all chest drains should “swing”. Some drains will continue to “bubble” for several hours, if this is prolonged beyond 12hrs or if the lung fails to expand this may indicate major tracheobronchial tree injury which will require specialist cardiothoracic repair.

Blood loss from a chest drain should also be monitored and documented. A chest drain initially yielding >1.5L blood or >200mls/hr for >2hrs requires urgent surgical consideration of damage control surgery.

Monitor for kinking or obstruction of the chest drain tubing or, if in use, any one way valve. A suspected obstruction, especially if this occurs alongside a clinical deterioration, carries a risk of tension pneumothorax development: any valves should be disconnected and tubing straightened to allow air accumulated be allowed to released and once the casualty is stabilised the equipment should be reset to its previous condition.

If used, the underwater seal should be kept below the level of the patient. Avoid clamping tubing except for brief periods during patient transfers if absolutely essential. 


Paediatric considerations

A smaller incision and smaller forceps may be required in paediatric patients. Careful attention should be paid to passing immediately above the rib in small rib-spaces to avoid the neuro-vascular bundle.

In small children it may be impossible to insert a finger through a rib space. In this situation one or two forcep tips should be used to widen the parietal pleural incision and hold it open for long enough to decompress the pleural cavity. 

Smaller sized chest drains will be required in paediatric patients in line with the table below. Placement length should ensure that there is a least 4cm from the final drainage eyelet to the skin - this may vary between manufacturers, but approximate recommendations are included in the table below. 

Age Max chest drain diameter (Fr) Chest drain length (cm)
0-1 16 9
2-4 20 10
5-8 24 12.5
9-12 28 14
13-16 32 14

If these drain sizes are not available within deployed modules, consideration may be given to improvised options including chest drains taken from Seldinger chest drainage systems, Foley catheters or NG tubes.


Prolonged Casualty Care

Continue to monitor clinical condition, vital signs, drain observations and to manage analgesia as per the above recommendations. 

Maintain cleanliness of chest drain site. If the chest drain has been sited forward of deployed hospital care or if there are any concerns about contamination then administer antibiotics in line with current antimicrobial guidance.

Tube Thoracostomy - Seldinger Chest Drain

Quick reference available here.

Prepare, position the casualty and confirm landmarks as above. POCUS confirmation of insertion site should be used prior to drainage of a pleural effusion or empyema.

Gather equipment required – Chlorhexidine or iodine to clean site, sterile gloves, complete Seldinger chest drainage system, hand tie suture, sterile drapes, one way (flutter) valve OR underwater drainage system, dressings, local anaesthetic and delivery equipment.

If using a one way (flutter) valve, ensure this is prepared for use and with the remainder of the equipment. If using an underwater drainage system have an assistant prepare this and be ready to hand you the patient connector once the drain is successfully inserted.

Clean the surgical site and put on sterile gloves. Position sterile drapes allowing a window around the identified insertion site. Deliver local anaesthetic as above unless the casualty is anaesthetised.

Using the Seldinger system insertion needle, with an attached syringe, advance into the identified pleural space aiming immediately above the lower rib. Resistance and a “pop” may be felt when passing through the parietal pleura. Aspirate as the needle is advanced until a rush of air/fluid into the syringe is obtained, confirming access to the pleural cavity.

Noting the depth of the needle, remove the syringe and feed the Seldinger system guidewire through the needle. An attempt can be made to guide the drain inferiorly for blood/fluid or superiority for an isolated pneumothorax using the direction of the needle. The wire should advance without resistance until around ½ is inside the pleural cavity.

Always stabilising the guidewire, carefully remove the needle, then use a scalpel to make a small incision through the skin where the guidewire passes through. Ensure the wire can move freely within this incision and no skin tag remains.

Continuing to stabilise the guidewire, advance the dilator over the wire, ensuring the end of the wire is held distal to the dilator before it passes into the skin. Advance the dilator through the skin, intercostal space and parietal pleura with a gentle but firm “corkscrewing” motion, taking care to avoid excess shearing forces on the guidewire. Take care not to push the dilator beyond this point. Allow this to remain in place for 30 seconds to let the tissues relax.

Again stabilising the guidewire, carefully remove the dilator then feed the chest drain from the Seldinger chest drain system over the wire. As with the dilator, ensure the end of the wire is held at the distal end of the drain before the drain is passed through the skin. Using the previously noted depth, advance the chest drain until all drainage eyelets are within the pleural cavity. In most adults the drain will be between 15-20cm in length at the skin.

Remove the guidewire carefully, controlling the chest drain throughout. Verify with an assistant that the wire has been removed and is undamaged. If the Seldinger system includes a stiffening stylet within the drain ensure this is also removed.

Connect the drain to the one-way valve or underwater circuit. Care should be taken to avoid the weight of either system pulling out the newly inserted drain. Observe the one-way valve for movement OR the underwater circuit for “swinging” (movement of the water level) and/or “bubbling” with ventilation as a confirmation of position within the pleural cavity.

Suture the drain in place using a recognised securing technique then cover with clear adhesive dressings and securing with further tape, or use the special dressing that may be available in the Seldinger kit to secure the drain.


Post-Procedure Care

Reassess the casualty for improvement in clinical signs and/or reduction of respiratory distress. 

When possible, obtain a Chest X-Ray to confirm drain position and improvement in effusion or pneumothorax. Serial POCUS may be used in experienced hands where this is not available.

Continue to monitor and record vital signs, provide appropriate analgesia and manage concurrent injuries in line with the MARCH approach. Chest drain activity should be monitored and documented. If connected to an underwater circuit as a minimum all chest drains should “swing” with respiration. 

Monitor for kinking or obstruction of the chest drain tubing or, if in use, any one way valve. A suspected obstruction, especially if this occurs alongside a clinical deterioration, carries a risk of tension pneumothorax development: any valves should be disconnected and tubing straightened to allow air accumulated be allowed to released and once the casualty is stabilised the equipment should be reset to its previous condition.

If used, the underwater seal should be kept below the level of the patient. Avoid clamping tubing except for brief periods during patient transfers if absolutely essential. 


Paediatric considerations

Only a single size of Seldinger chest drain (16 Fr) is carried in deployed medical modules. This could be safely used in any child but in those <30kgs would no longer be considered a “small diameter” drain.

Particular care must be taken around depth of needle insertion to avoid underlying organ injury.


Prolonged Casualty Care

Continue to monitor clinical condition, vital signs, drain observations and to manage analgesia as per the above recommendations. 

Maintain cleanliness of chest drain site. If the chest drain has been sited forward of deployed hospital care or if there are any concerns about contamination then administer antibiotics in line with current antimicrobial guidance.