Deployed Tracheostomy Care

Warning

Objectives

This clinical guideline details Tracheostomy Nursing Care encompassing:

-          Safety considerations

-          Cuff management

-          Safe suctioning

-          Daily care

-          Emergencies

Scope

This guideline covers daily nursing care and considerations when caring for a patient with a Tracheostomy in the deployed Critical Care. The scope of this guideline does not cover insertion (see Critical Care LocSSIPs), tube changes, use of speaking valves, weaning, downsizing or decannulation.

Audience

Critical Care Nursing, Physiotherapy and Medical Personnel.

Deployed ward personnel.

Prolonged Casualty Care

During Large Scale Combat Operations supply chains may be disrupted and access to cleaning solutions, replacement dressings and consumables may be limited. When operating under these conditions every effort should be made to maintain standards and keep the Tracheostomy site clean and secure.

Daily Checks

Daily Assessment

At the start of each shift the nurse caring for the patient with a tracheostomy should carry out a full assessment of the patient, which should include:

  • Indication and date of tracheostomy insertion.
  • Technique used; surgical or percutaneous
    • may have implications for ease of re-insertion
  • Appreciate anatomy
    • does the patient have a larynx? (i.e. do they have a communication between the oral airway and the lungs)
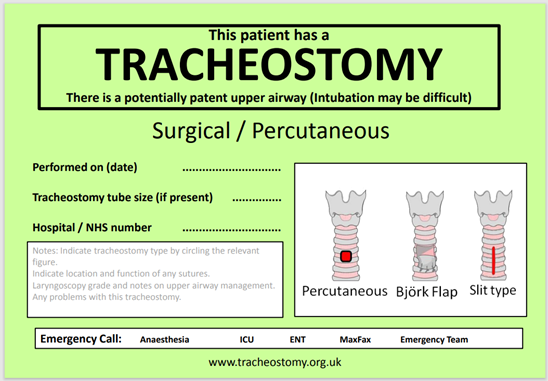
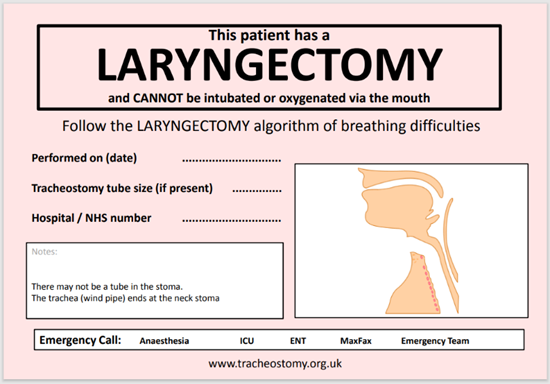
  • Presence of bed-head safety sign
  • Type and size of tracheostomy tube & availability of spare & emergency equipment
  • Cough effort.
  • Ability to swallow.
  • Sputum characteristics (Colour, Volume, Consistency, Odour)
  • Check and change inner cannula for any build-up of secretions.
  • Check tracheostomy holder is secure and clean
  • Check stoma dressing is clean

This assessment should be documented on the care plan at the start of every shift.

Bedside spares

Following insertion nursing staff are to ensure that a Tracheostomy spares tray is made up for the patient and available on the bedside trolley.  In routine NHS practice these spares are in a blue box at the bedside, these boxes are not available in the deployed setting however blue trays are routinely available and should be used instead. The spares tray must include:

  • Tracheostomy tubes (one same size and one size down)
  • Suction catheters (selection 10Fr, 12Fr, 14Fr)
  • Scissors
  • Stitch cutter
  • Lubricating jelly
  • Tracheostomy Tapes
  • Spare inner tube with a clean pot for storage
  • Tracheostomy dressing
  • Dilators
  • Sterile gloves
  • Sterile water
  • 10ml syringe
  • Eye protection

Humidification

Patients must at a minimum have an HME in the breathing circuit. To prevent complications, where possible this should be changed to a humidified circuit warmed with the Fisher Paykel heated humidifier.
Bedside Safety Signs

Should be present above the head of the bed for all patients with either a tracheostomy or laryngectomy.

Cuff Management

Cuff Pressure Monitoring

Tracheal Cuff pressure must be checked using a cuff manometer every shift, adjusted as necessary and recorded in the patients notes. Tracheal capillary pressure lies between 20- 30mmHg and an impairment of this blood flow will be caused by an obstruction between 22-37mm Hg. Tracheostomy tube cuff pressure should be kept between 15-25cmH2O to prevent complications.

The lowest pressure that avoids a leak should be used


Cuff leaks

Can occur for a number of reasons:

  • Defective or damaged cuff (sometimes occur on insertion of the tube)
  • Cuff not adequately inflated
  • Patient is requiring high ventilator pressures and/or PEEP/CPAP which exceed the sealing capacity of the cuff
  • Tube does not fit the airway
    • Simply too small
    • Positional changes cause a leak
    • Tracheomalacia or wound breakdown.

Cuff pressure must not routinely be increased to manage cuff leaks, where this is trialled, pressure must not be increased above a maximum of 35cmH2O.

Cuff leaks must be highlighted to medical personnel and the source of the leak identified and managed to prevent airway compromise.

Safe Suctioning

Suction pressure

In the deployed setting portable suction is most likely to be used rather than wall suction. Caution should be taken when applying suction to Tracheostomy tubes, pressures between -80 mmHg to no greater than -150 mmHg are appropriate for most patients. 

Suction catheter size

Inner Diameter of Tracheostomy Tube (mm) Suction Catheter Size
French Gauge (FG) (mm)
10 14 4.5
9 12 4.0
8 12 4.0
7 12* 4.0
6 10 3.3
5 8 2.6

*It is more appropriate to use a size 12 catheter as although it is slightly larger than ½ diameter it is more effective for secretion removal


Performing Suction 

Personnel must be proficient in performing both open and closed suction via a Tracheostomy prior to deployment. There may be a requirement to upskill additional staff in the deployed setting and training for this should be provided with the oversight of the deployed HoD. National Tracheostomy Safety Project has produced some useful videos:

https://youtu.be/lGpfuHdrUgk?si=SeLlaFxtFZYPGsYW

Suction changes 

Open suction catheters are single use and must be disposed of immediately.

Closed tracheostomy suction tubing should be changed every 24-72hrs (check manufacturer guidance for the items held within the deployed modules as consumables provided do vary depending on the supply chain).

Inner Tube Changes

Inner tubes should be removed, inspected and changed at regular intervals from 2-8 hourly, depending on burden of secretions and patient's cough strength.

Procedure

Observe the patient throughout and ensure assistance is available in the event of any complications.

  1. Clean hands, apply PPE including eye protection
  2. Perform tracheal suction if necessary
  3. Disconnect ventilator tubing if patient receiving mechanical ventilation
  4. With one hand stabilise the outside of the tracheostomy tube, remove the inner tube with the other hand.
  5. Replace with clean/spare inner tube
  6. Replace ventilator tubing
  7. Clean secretion from the used inner tube with sterile water and foam sponges.
  8. Shake off excess water and allow to air dry in a clean container prior to re-use.  

Stoma Care

The tracheostomy stoma site should be kept clean and free of secretions. Dressings to the stoma site should be changed once a shift. This must always be completed with two trained staff and with airway management assistance available in the event of complications.

Procedure

  1. Clean hands
  2. Prepare the dressing tray: open sterile dressing pack, open onto it the: tracheostomy dressing, tapes, gauze, 0.9% Nacl, barrier cream.
  3. Both nurses put on apron, gloves and eye protection.
  4. Nurse 1 holds the tracheostomy tube throughout the procedure.
  5. Nurse 2 removes the tapes and dressing, disposing into clinical waste.
  6. Nurse 2 cleans around the stoma with 0.9%Nacl and gauze, allows to air dry before applying barrier cream.
  7. Nurse 2 replaces the tracheostomy dressing and ties, checking that they are not too tight and two fingers can be placed between the ties and patients’ neck.
  8. Remove apron, gloves and eye protection, dispose of waste and document in patients notes.

Emergency Management

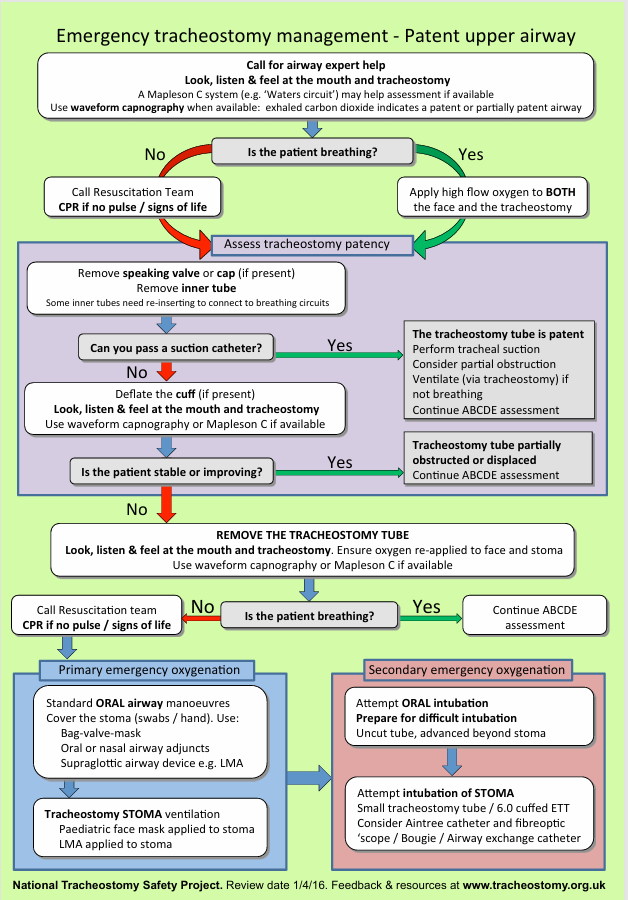
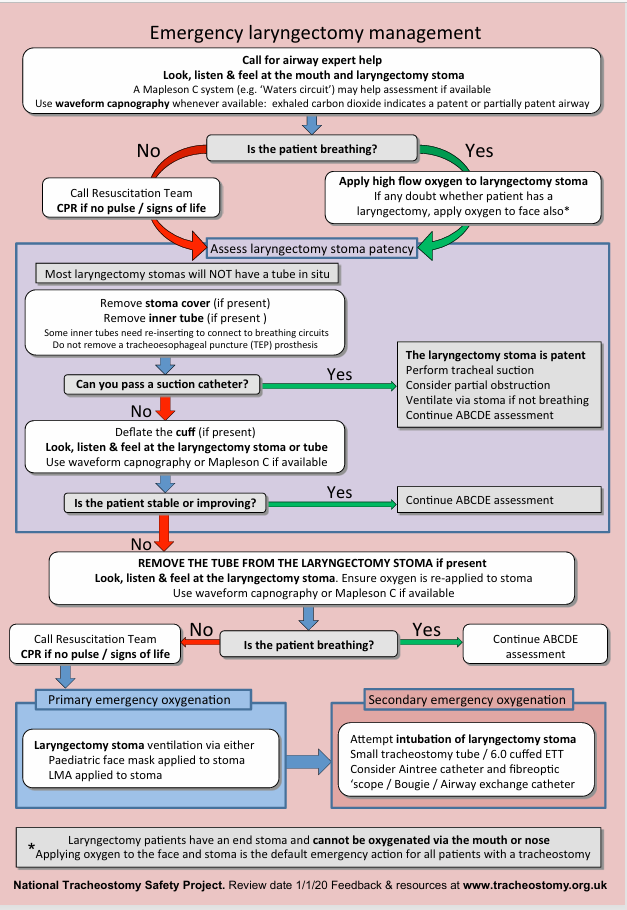
Emergency Management should follow National Tracheostomy Safety Project algorithms, presented below and available at tracheostomy.org.uk


Last reviewed: 29/09/2026

Next review date: 29/09/2027

References

Intensive Care Society (2020). Tracheostomy Guidelines 2020-08 Tracheostomy_care_guidance_Final.pdf (ficm.ac.uk)

National Tracheostomy Safety Project (2025) Tracheostomy

The Royal Marsden NHS Foundation Trust, (2020). The Royal Marsden manual of clinical and cancer nursing procedures (10th ed.). Wiley. Procedures - Royal Marsden Manual